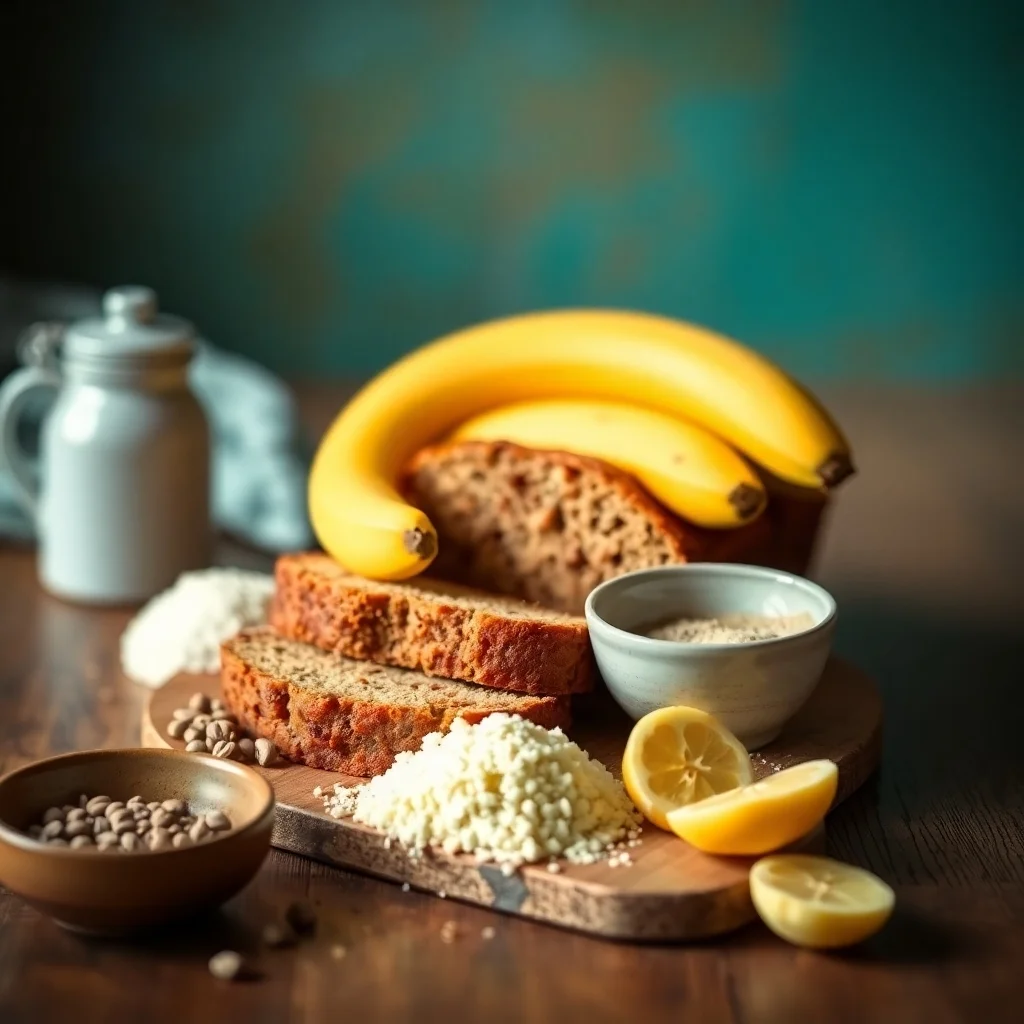
Introduction: The Best Banana Bread Recipe You’ll Ever Need
There’s nothing quite as comforting as a warm, freshly baked banana bread straight from the oven. Whether you enjoy it for breakfast, as an afternoon snack, or as a sweet treat after dinner, banana bread is a timeless classic loved by many.
Not only is it deliciously moist and fluffy, but it’s also a great way to use up overripe bananas instead of letting them go to waste. With just a few simple ingredients and minimal effort, you can create a homemade banana bread that’s soft, flavorful, and perfect every time.
In this step-by-step guide, I’ll walk you through how to make the perfect banana bread, including tips to ensure it turns out moist, fluffy, and packed with flavor. Whether you’re a beginner baker or a seasoned pro, this foolproof recipe is one you’ll want to make again and again!
Let’s get started! 🍌🍞
Why You’ll Love This Banana Bread Recipe

Super Moist and Fluffy Texture
One of the biggest challenges when making banana bread is achieving the perfect moist and fluffy texture. Nobody wants dry, crumbly banana bread! Here’s how you can ensure every slice is soft, tender, and full of flavor.
1. Use Overripe Bananas
- The best banana bread starts with overripe bananas—the ones with brown spots or even completely black skins.
- Overripe bananas are naturally sweeter and contain more moisture, making the bread extra soft and flavorful.
- If your bananas aren’t ripe enough, you can quickly ripen them by:
- Placing them in a brown paper bag for 1-2 days.
- Baking them in the oven at 300°F (150°C) for 15-20 minutes until the skins turn black.
2. Avoid Overmixing the Batter
- When mixing the wet and dry ingredients, be gentle—stir just until combined.
- Overmixing develops too much gluten, leading to a dense and tough banana bread.
- A few lumps in the batter are perfectly fine and help keep the texture light.
3. Choose the Right Fats for Extra Moisture
- Using butter gives banana bread a rich, classic flavor.
- Swapping in vegetable oil makes it even moister because oil retains moisture better than butter.
- You can also use Greek yogurt or sour cream to add moisture and create a soft, delicate crumb.
4. Bake at the Right Temperature
- Low and slow baking (typically at 350°F / 175°C for about 50-60 minutes) ensures even cooking and prevents the bread from drying out.
- Overbaking can lead to a dry loaf, so always check doneness using the toothpick test—a clean or slightly moist toothpick means it’s ready!
By following these tips, your banana bread will turn out perfectly soft, fluffy, and moist every single time! 🍌🍞
Simple Ingredients, No Fancy Equipment Needed
One of the best things about making banana bread is that you don’t need any fancy tools or hard-to-find ingredients. This recipe comes together with basic pantry staples and a few kitchen essentials, making it accessible for beginners and experienced bakers alike.
1. Basic Ingredients You Likely Already Have
This banana bread recipe uses everyday ingredients you probably have in your kitchen:
- Ripe Bananas – The star of the recipe! The riper the bananas, the better the flavor and moisture.
- All-Purpose Flour – The base of the bread, providing structure. You can also use whole wheat flour for a healthier twist.
- Granulated Sugar or Brown Sugar – Brown sugar adds extra moisture and a hint of caramel flavor.
- Eggs – Helps bind the ingredients together and creates a soft, fluffy texture.
- Butter or Oil – Butter adds richness, while oil makes the bread even more moist.
- Baking Soda – Acts as a leavening agent, helping the bread rise beautifully.
- Salt & Vanilla Extract – Enhances the flavors for a perfectly balanced taste.
You can also customize your banana bread with optional add-ins like chocolate chips, nuts, or cinnamon for extra flavor!
2. No Mixer Needed – Just a Bowl and a Fork!
Unlike other baked goods that require a stand mixer or hand mixer, banana bread is incredibly easy to mix by hand. Here’s why:
- Mashing Bananas – You only need a fork or potato masher to mash the bananas until smooth.
- Mixing Ingredients – A simple whisk or wooden spoon is enough to combine the wet and dry ingredients.
- Minimal Effort – No need for kneading or heavy mixing—just stir until combined!
3. Basic Kitchen Tools You’ll Need
Since this is a simple, beginner-friendly recipe, you only need a few essential kitchen tools:
- Mixing Bowls – One for dry ingredients and one for wet ingredients.
- Measuring Cups & Spoons – To ensure accurate ingredient ratios.
- Fork or Whisk – For mashing bananas and mixing ingredients.
- Spatula or Wooden Spoon – To gently combine everything together.
- Loaf Pan – A standard 9×5-inch loaf pan works best for baking.
- Oven & Toothpick – Bake at 350°F (175°C) and use a toothpick test to check for doneness.
Since no special equipment is required, this banana bread recipe is perfect for beginner bakers or anyone who wants a quick and easy homemade treat with minimal cleanup!
Perfect for Breakfast, Snacks, or Dessert
One of the best things about banana bread is its versatility—it can be enjoyed at any time of the day! Whether you need a quick breakfast, a satisfying snack, or a delicious dessert, banana bread is the perfect choice. Let’s explore why this classic treat is a must-have in your kitchen.
1. A Wholesome and Energizing Breakfast
Banana bread is a great morning meal option because it provides a good balance of carbohydrates, natural sugars, and healthy fats to give you energy for the day ahead.
- Pair it with coffee or tea for a comforting start to your morning.
- Top it with peanut butter, almond butter, or Greek yogurt for added protein.
- Warm it up and add fresh fruits like berries for a nutritious twist.
- Make it healthier by using whole wheat flour, reducing sugar, or adding oats.
If you’re always on the go, banana bread is an easy grab-and-go breakfast that requires no preparation—just slice and enjoy!
2. A Satisfying and Portable Snack
Need an afternoon pick-me-up? Banana bread makes a filling and portable snack that satisfies cravings without being overly heavy.
- It’s easy to pack in a lunchbox, take to work, or bring on road trips.
- The natural sweetness of bananas keeps sugar cravings at bay.
- It pairs well with a handful of nuts or a smoothie for a balanced snack.
- It stays fresh for several days, making it great for meal prepping.
For an extra special treat, spread Nutella, honey, or butter on a warm slice—it’s irresistible!
3. A Delicious and Comforting Dessert
Banana bread isn’t just for breakfast—it’s also a fantastic dessert that can be dressed up in many ways:
- Drizzle it with melted chocolate or caramel sauce for extra indulgence.
- Serve it with a scoop of vanilla ice cream for a simple but delicious dessert.
- Make it extra special by adding chocolate chips, walnuts, or coconut flakes.
- Turn it into banana bread pudding or French toast for a creative dessert idea.
Whether you’re looking for a light and sweet treat or a decadent dessert, banana bread is a versatile and crowd-pleasing choice for any occasion!
Essential Ingredients for the Best Banana Bread
Key Ingredients: Ripe Bananas, Flour, Sugar, Eggs, Butter/Oil, Baking Soda
A great banana bread recipe starts with a handful of simple but essential ingredients. Each ingredient plays a key role in ensuring your banana bread turns out moist, fluffy, and flavorful. Let’s take a closer look at these key components and why they matter.
1. Ripe Bananas – The Star Ingredient 🍌
Bananas are the main flavor and moisture source in banana bread, so it’s crucial to use them at the right stage of ripeness.
✅ Best Bananas for Banana Bread:
- Use overripe bananas with brown spots or fully black peels. These bananas are sweeter, softer, and easier to mash, which enhances both the texture and taste.
- Unripe or just-ripe bananas don’t have enough natural sugars and can make the bread dry and bland.
✅ Quick Ripening Tips:
If your bananas aren’t ripe enough, here’s how you can speed up the process:
- Place them in a brown paper bag for 24–48 hours to trap ethylene gas and speed ripening.
- Bake them in the oven at 300°F (150°C) for 15–20 minutes until the peels turn black and the insides become soft and sweet.
2. Flour – The Structure Builder 🌾
Flour provides the structure and stability for the banana bread.
✅ Best Flour Options:
- All-Purpose Flour – The most commonly used flour, providing a soft yet structured texture.
- Whole Wheat Flour – A healthier alternative, but it makes the bread slightly denser.
- Gluten-Free Flour – A great option for those with gluten sensitivities; use a 1:1 gluten-free blend for the best results.
🔹 Tip: Sifting the flour before mixing helps create a lighter and fluffier texture by preventing clumps.
3. Sugar – Sweetness & Moisture Enhancer 🍯
Sugar does more than just sweeten the banana bread—it also helps keep it moist and tender.
✅ Types of Sugar You Can Use:
- Granulated White Sugar – Provides a clean, neutral sweetness.
- Brown Sugar – Adds a deeper, caramel-like flavor and extra moisture due to its molasses content.
- Honey or Maple Syrup – Natural alternatives that add a subtle richness and keep the bread soft.
🔹 Tip: If using brown sugar, pack it tightly into the measuring cup for an accurate amount.
4. Eggs – The Binding Agent 🥚
Eggs help bind all the ingredients together and contribute to the bread’s structure and moisture.
✅ Best Egg Alternatives (For Egg-Free Banana Bread):
If you’re allergic to eggs or following a vegan diet, try these substitutes:
- Flax Egg: Mix 1 tbsp ground flaxseed + 3 tbsp water (let sit for 5 minutes).
- Unsweetened Applesauce: Use ¼ cup per egg for a soft and moist texture.
- Mashed Banana or Yogurt: Adds extra moisture but may make the bread denser.
🔹 Tip: Make sure your eggs are at room temperature to ensure even mixing.
5. Butter or Oil – The Key to Moist Banana Bread 🧈
Fat is essential for making banana bread soft, rich, and tender. You can choose between butter or oil, depending on the texture and flavor you prefer.
✅ Butter vs. Oil – Which One is Better?
| Fat Type | Texture & Flavor |
|---|---|
| Butter | Adds a rich, buttery taste with a slightly firmer texture. |
| Vegetable Oil | Creates an extra moist and tender banana bread. |
| Coconut Oil | Adds a mild coconut flavor and keeps the bread soft. |
| Greek Yogurt or Sour Cream | A healthy alternative that keeps the bread ultra-moist. |
🔹 Tip: If you want the best of both worlds, use half butter and half oil for a moist texture with a buttery taste.
6. Baking Soda – The Leavening Agent 🎂
Baking soda is what makes banana bread rise and creates a soft, fluffy texture.
✅ How Baking Soda Works in Banana Bread:
- It reacts with the acidity from the bananas and brown sugar, producing tiny air bubbles that help the bread rise.
- Without baking soda, the bread would turn out dense and heavy.
🔹 Tip: Make sure your baking soda is fresh (not expired), or your banana bread won’t rise properly. A good rule of thumb is to replace baking soda every 6 months.
Final Thoughts
Each of these ingredients plays a crucial role in making the perfect banana bread. By choosing ripe bananas, the right type of flour, sugar, eggs, fat, and fresh baking soda, you’ll get a deliciously moist, fluffy, and flavorful banana bread every time! 🍌🍞
Optional Add-ins: Walnuts, Cinnamon, Chocolate Chips 🍌🍫🌰
One of the best things about banana bread is how versatile it is—you can customize it with delicious add-ins to suit your taste! Whether you love a little crunch, a hint of spice, or extra chocolatey goodness, these optional ingredients can take your banana bread to the next level.
1. Walnuts – A Crunchy & Nutty Addition 🌰
Walnuts are one of the most popular mix-ins for banana bread because they add a delicious crunch and a rich, nutty flavor that perfectly complements the sweetness of the bananas.
✅ Why Add Walnuts?
✔️ Texture Contrast: The crunchiness of walnuts balances the soft, fluffy texture of the bread.
✔️ Rich Flavor: Adds a slightly bitter, earthy taste that pairs well with the natural sweetness of bananas.
✔️ Healthy Boost: Walnuts are packed with healthy fats, protein, and omega-3 fatty acids, making your banana bread more nutritious.
🔹 How to Add Walnuts to Your Banana Bread:
- Chop ½ to ¾ cup of walnuts into small pieces before mixing them into the batter.
- Lightly toast the walnuts in a pan or oven for 5–7 minutes before adding them—this enhances their flavor and makes them even crunchier.
- Sprinkle some extra chopped walnuts on top before baking for a beautiful, bakery-style look.
🔸 Nut-Free Alternative: If you have a nut allergy, try adding pumpkin seeds, sunflower seeds, or shredded coconut for a similar texture.
2. Cinnamon – A Warm, Spiced Flavor Boost 🍂
Cinnamon is a simple yet powerful addition that enhances the flavor of banana bread with its warm, aromatic, and slightly sweet taste.
✅ Why Add Cinnamon?
✔️ Enhances Banana Flavor: Cinnamon naturally enhances the sweetness of bananas.
✔️ Cozy & Comforting: Adds a warm, bakery-style aroma that makes your kitchen smell amazing.
✔️ Pairs Well with Other Ingredients: Complements walnuts, chocolate chips, brown sugar, and vanilla perfectly.
🔹 How to Add Cinnamon to Your Banana Bread:
- Stir in ½ to 1 teaspoon of ground cinnamon into the dry ingredients before mixing.
- For extra spice, try adding a pinch of nutmeg, allspice, or cardamom.
- Dust a little cinnamon-sugar mixture on top before baking for a slightly crisp, caramelized crust.
🔸 Alternative Spices: If you love spice, you can experiment with pumpkin spice, chai spice, or even ginger for a unique twist!
3. Chocolate Chips – A Sweet & Decadent Treat 🍫
If you love chocolate and bananas, adding chocolate chips to banana bread is a match made in heaven! It turns a simple loaf into a decadent, dessert-like treat that’s hard to resist.
✅ Why Add Chocolate Chips?
✔️ Rich & Indulgent: Melty chocolate adds a delicious gooey texture.
✔️ Perfect for Kids & Chocolate Lovers: Makes banana bread taste even more like dessert.
✔️ Pairs Well with Bananas & Nuts: The sweetness of chocolate complements both walnuts and bananas beautifully.
🔹 How to Add Chocolate Chips to Your Banana Bread:
- Use ½ to ¾ cup of chocolate chips—either milk, dark, or semi-sweet, depending on your preference.
- Toss the chocolate chips in 1 teaspoon of flour before adding them to the batter—this prevents them from sinking to the bottom.
- Sprinkle a few extra chocolate chips on top before baking for a beautiful, bakery-style finish.
🔸 Chocolate Alternatives: If you want a different kind of sweetness, try adding white chocolate chips, caramel chips, or even chopped dried fruit like raisins or cranberries!
Final Thoughts: Customize Your Banana Bread!
These optional add-ins allow you to personalize your banana bread based on your taste preferences. Whether you love crunchy walnuts, warm cinnamon spice, or rich chocolate chips, you can mix and match to create your perfect version of banana bread! 🍌🍞
Choosing the Right Bananas: How to Tell When Bananas Are Ripe Enough 🍌
One of the most important factors in making deliciously moist and flavorful banana bread is choosing the right bananas. Using bananas at the perfect stage of ripeness ensures natural sweetness, softness, and moisture, which all contribute to the bread’s texture and taste.
Let’s take a deep dive into how to tell when your bananas are ripe enough, why ripeness matters, and how to quickly ripen bananas if needed!
1. What’s the Best Stage of Ripeness for Banana Bread?
The best bananas for banana bread are those that are very ripe to overripe—meaning they have lots of brown spots or are completely blackened on the outside. Here’s a guide to banana ripeness levels:
| Banana Stage | Color & Texture | Best Use |
|---|---|---|
| Green/Unripe | Bright green peel, firm texture | Not suitable for banana bread (too starchy, not sweet) |
| Just Ripe | Yellow peel, firm texture | Great for snacking, not ideal for baking |
| Speckled Ripe | Yellow with brown spots, softer texture | Good for banana bread, naturally sweet |
| Overripe | Mostly brown, very soft and mushy | Best for banana bread! Sweetest and easiest to mash |
| Black & Very Soft | Completely black peel, extremely soft inside | Perfect for banana bread! Most flavorful and moist |
✅ The ideal banana for banana bread should have at least 50% brown spots or be fully blackened. The darker the banana, the more natural sugars have developed, making your banana bread sweeter and more flavorful.
🔹 Avoid using green or just-ripe bananas, as they are still too firm, starchy, and lack natural sweetness, which can result in dry and bland banana bread.
2. Why Do Riper Bananas Make Better Banana Bread?
When bananas ripen, their starches convert into natural sugars, which enhances the overall taste and texture of your banana bread. Here’s why overripe bananas work best:
✔️ More Natural Sweetness – The riper the banana, the sweeter your banana bread will be (you can even reduce added sugar!).
✔️ Softer & Easier to Mash – Overripe bananas are naturally soft and creamy, making them easy to incorporate into the batter.
✔️ Adds More Moisture – The high sugar and moisture content prevent the bread from being dry or crumbly.
✔️ Stronger Banana Flavor – Ripe bananas have a deeper, richer banana taste, making your bread more flavorful.
3. How to Ripen Bananas Faster (If Yours Aren’t Ready)
If your bananas are still yellow or slightly green, don’t worry! There are a few simple methods to speed up the ripening process so you can still make banana bread today.
✅ Fastest Ways to Ripen Bananas:
1. Oven Method (20 Minutes) – Best for Immediate Use
If you need ripe bananas right away, the oven method is the quickest solution.
🔹 How to do it:
- Preheat your oven to 300°F (150°C).
- Place unpeeled bananas on a baking sheet lined with parchment paper.
- Bake for 15–20 minutes, or until the peels turn completely black and the bananas feel soft.
- Let them cool for a few minutes before peeling and mashing.
📝 Tip: This method works best for bananas that are at least yellow but not fully green.
2. Paper Bag Method (1–2 Days) – Natural Ripening
If you have a day or two to wait, this method allows bananas to ripen naturally.
🔹 How to do it:
- Place bananas in a brown paper bag and fold the top to seal it.
- Add an apple or ripe banana inside the bag—this releases ethylene gas, which speeds up ripening.
- Leave the bag at room temperature for 24–48 hours.
📝 Tip: Check daily until the bananas develop brown spots and feel soft.
3. Microwave Method (30 Seconds) – Quick but Temporary Softening
If you just need to soften bananas for easy mashing, the microwave method works. However, it won’t develop the deep sweetness of naturally ripened bananas.
🔹 How to do it:
- Peel the banana and place it on a microwave-safe plate.
- Microwave on high for 30 seconds.
- Check the softness—if still firm, continue microwaving in 10-second intervals until soft.
📝 Tip: This method is best used when bananas are already yellow but just need a little extra softening.
4. Can You Use Frozen Bananas for Banana Bread?
Yes! Frozen bananas work perfectly for banana bread and can even enhance moisture and sweetness. If you have overripe bananas but aren’t ready to bake, freezing them is a great way to preserve them.
🔹 How to Freeze Bananas:
- Peel the bananas and place them in an airtight container or freezer bag.
- Store in the freezer for up to 6 months.
🔹 How to Use Frozen Bananas for Banana Bread:
- Let the bananas thaw at room temperature for about 15–30 minutes.
- Drain any excess liquid before mashing and adding them to the batter.
📝 Tip: Thawed bananas may look watery and mushy—this is normal! Just drain any extra liquid before mixing.
Final Thoughts: The Secret to the Best Banana Bread
The secret to perfect banana bread starts with choosing the right bananas! Always use overripe bananas that are at least 50% brown or completely black, as they provide the sweetest flavor, softest texture, and best moisture.
If your bananas aren’t quite ready, use quick ripening methods like the oven or paper bag trick to get them just right. And if you have extra ripe bananas, freeze them for future baking—your next banana bread will be just as delicious!
Step-by-Step Guide to Making the Perfect Banana Bread

Step 1: Preheat the Oven & Prepare the Loaf Pan 🔥🍞
Before you start mixing ingredients, the first step in making the perfect banana bread is to preheat your oven and prepare your loaf pan properly. This simple but crucial step ensures that your banana bread bakes evenly, doesn’t stick to the pan, and has the right texture.
1. Preheating the Oven: Why It’s Important
✅ Preheat to 350°F (175°C) – This is the ideal temperature for banana bread. It allows the bread to bake evenly without drying out or burning.
Many people make the mistake of not preheating the oven fully, which can lead to uneven baking. If the oven is too cold when you put the batter in:
- The bread may not rise properly.
- The outside may brown too slowly, while the inside stays too wet.
📝 Tip: Always turn on your oven before you start mixing your ingredients. It typically takes 10–15 minutes for an oven to reach 350°F.
2. Choosing & Preparing the Right Loaf Pan
The right pan makes a big difference in how your banana bread bakes.
✅ Best Pan to Use for Banana Bread:
- Standard 9×5-inch loaf pan – This size works best for most banana bread recipes, allowing for even baking and a nicely shaped loaf.
- 8.5×4.5-inch loaf pan – Slightly smaller, making the bread a bit taller and thicker.
- Glass vs. Metal vs. Ceramic:
- Metal pans heat up quickly, giving a nice golden crust.
- Glass or ceramic pans retain heat longer, which can slightly increase baking time.
- If using a dark metal pan, reduce the oven temperature by 5–10°F to prevent over-browning.
🔹 How to Properly Grease and Line Your Pan
To prevent sticking and ensure easy removal of the bread, follow these simple steps:
1️⃣ Grease the pan well – Use butter or non-stick cooking spray to coat the bottom and sides of the pan.
2️⃣ Flour the pan (optional) – After greasing, dust the inside with a light coating of flour to create an extra non-stick layer.
3️⃣ Use parchment paper for easy removal – Cut a piece of parchment paper to fit the bottom and sides of the pan, leaving an overhang. This allows you to lift the bread out effortlessly after baking.
📝 Tip: If using parchment paper, lightly grease it as well for extra non-stick protection.
3. Double-Checking the Oven Temperature
Even if your oven says it’s at 350°F, it may not be accurate. Oven temperatures can fluctuate, leading to uneven baking.
🔹 How to check if your oven temperature is correct:
- Use an oven thermometer to verify the actual temperature.
- If your oven runs hot, lower the temperature slightly to prevent over-browning.
- If your oven runs cool, increase the temperature by 5–10°F or extend the baking time slightly.
📝 Tip: Always place the loaf pan in the center of the oven for the most even heat distribution.
Final Thoughts: The Perfect Start for Perfect Banana Bread
By properly preheating your oven and preparing your loaf pan, you set yourself up for banana bread success! Ensuring the right oven temperature and using a well-greased pan will result in a beautifully baked, golden brown, moist, and fluffy banana bread every time.
Step 2: Mash the Bananas and Mix the Wet Ingredients 🍌🥄
Now that your oven is preheated and your loaf pan is prepared, it’s time to work on the wet ingredients. This step is crucial for ensuring a moist and flavorful banana bread with the perfect texture. Properly mashing the bananas and whisking the wet ingredients together will create a smooth, well-balanced batter.
1. Choosing & Mashing the Bananas
Bananas are the key ingredient in this recipe, providing natural sweetness, moisture, and a rich banana flavor. Using the right bananas will significantly impact the texture and taste of your banana bread.
✅ How to Choose the Best Bananas
- The best bananas for banana bread are overripe, meaning they should have dark brown or black spots on their peel. The more spots, the better!
- A soft, mushy texture is ideal since ripe bananas blend effortlessly into the batter.
- The riper the bananas, the sweeter and more flavorful the banana bread will be.
📝 Tip: Need to ripen bananas quickly? Try one of these methods:
- Place the bananas in a paper bag with an apple or another ripe banana. This speeds up the ripening process overnight.
- Bake unpeeled bananas in the oven at 300°F (150°C) for about 15 minutes until soft.
✅ How to Mash Bananas Properly
1️⃣ Peel the bananas and place them in a large mixing bowl.
2️⃣ Use a fork, potato masher, or the back of a spoon to mash them until mostly smooth.
3️⃣ A few small lumps are fine—they add texture to the bread. If you prefer a completely smooth consistency, use a blender or food processor to puree them.
4️⃣ Measure out 1 to 1¼ cups of mashed bananas (about 3–4 medium bananas). Adding too much can make the bread too dense.
📝 Tip: If you love extra banana flavor, you can increase the amount to 1½ cups of mashed bananas. However, be cautious, as too much banana can make the bread too wet and heavy.
2. Mixing the Wet Ingredients
Once the bananas are properly mashed, it’s time to combine them with the other wet ingredients. This step ensures the batter is smooth and well-balanced before adding the dry ingredients.
✅ Key Wet Ingredients & Their Role
- Mashed bananas – Provide natural sweetness, moisture, and flavor.
- Eggs (2 large) – Act as a binding agent, helping the bread rise and stay fluffy.
- Melted butter or oil (½ cup) – Adds richness and keeps the bread moist.
- Butter gives a deep, buttery flavor.
- Oil (vegetable, canola, or coconut) makes the bread even softer and prevents dryness.
- Brown or white sugar (¾ to 1 cup) – Sweetens the bread and affects texture.
- Brown sugar creates a softer, more flavorful bread.
- White sugar gives a slightly lighter texture.
- Vanilla extract (1 teaspoon) – Enhances the banana flavor and adds warmth.
✅ How to Whisk the Wet Ingredients Properly
1️⃣ In a large mixing bowl, whisk together the mashed bananas, eggs, melted butter (or oil), sugar, and vanilla extract.
2️⃣ Use a hand whisk or an electric mixer to mix everything until smooth.
3️⃣ Make sure the butter or oil is fully incorporated to avoid greasy spots in the batter.
4️⃣ Stop whisking once everything is well blended. Overmixing can lead to dense banana bread instead of a light and fluffy texture.
📝 Tip: The batter should have a slightly creamy consistency. If it looks too runny, double-check the banana-to-flour ratio before proceeding to the next step.
3. Substitutions & Adjustments
If you need to adjust the recipe for dietary preferences or ingredient availability, consider these simple swaps:
🔹 Dairy-Free Option: Use coconut oil or plant-based butter instead of butter.
🔹 Lower Sugar Alternative: Replace sugar with maple syrup, honey, or coconut sugar for a more natural sweetness.
🔹 Egg-Free Version: Use flax eggs (1 tbsp ground flaxseed + 3 tbsp water per egg) or unsweetened applesauce instead of eggs.
Final Thoughts: Creating a Moist & Flavorful Base
A well-mashed banana base combined with smoothly whisked wet ingredients lays the foundation for soft, rich banana bread. Once these elements are blended to the right consistency, the next step is combining the dry ingredients and mixing gently.
Now, you’re ready to move on to Step 3: Combine Dry Ingredients & Mix Gently for a perfectly balanced batter. 🍞✨
Step 3: Combine Dry Ingredients & Mix Gently 🥣✨
Now that the wet ingredients are well combined, it’s time to prepare the dry ingredients. This step is crucial because properly mixing the dry ingredients ensures that the banana bread has a light, fluffy texture instead of becoming dense or tough. Careful mixing will also evenly distribute the leavening agents, allowing the bread to rise beautifully.
1. Key Dry Ingredients & Their Role
Each dry ingredient plays an important role in the final texture and flavor of your banana bread. Let’s break them down:
✅ Flour (1 ¾ to 2 cups)
Flour provides the structure for the bread. Too much can make the bread dense, while too little may cause it to collapse. The right balance is key!
- All-purpose flour is the most common choice and works well for a classic banana bread texture.
- Whole wheat flour adds a nutty flavor and extra fiber, but it makes the bread slightly denser.
- Gluten-free flour blends can be used if you want a gluten-free version. Look for a 1:1 substitute that includes xanthan gum for better texture.
📝 Tip: To avoid a dense loaf, measure your flour properly. Instead of scooping directly from the bag, use the spoon-and-level method: Spoon the flour into the measuring cup, then level it off with a knife.
✅ Baking Soda (1 teaspoon)
Baking soda is the leavening agent that helps the banana bread rise, making it soft and fluffy.
- It reacts with the acidic components in the bananas and brown sugar to create air pockets, giving the bread its light texture.
- Using too much can cause a bitter aftertaste, so be precise with your measurement.
✅ Salt (½ teaspoon)
Salt enhances all the flavors in banana bread, balancing sweetness and bringing out the depth of the ingredients. It also strengthens the gluten in the flour, improving the bread’s texture.
✅ Cinnamon (Optional, ½ to 1 teaspoon)
For extra warmth and depth, cinnamon adds a subtle spice that pairs beautifully with bananas. If you love spiced banana bread, consider adding nutmeg or allspice as well.
2. How to Mix Dry Ingredients Properly
Before incorporating them into the wet ingredients, it’s important to mix the dry ingredients separately. This ensures that everything is evenly distributed and prevents clumping.
✅ Steps to Combine Dry Ingredients
1️⃣ In a large separate mixing bowl, add the flour, baking soda, salt, and any optional spices (like cinnamon).
2️⃣ Use a whisk or sifter to mix everything thoroughly. This aerates the flour, ensuring a lighter texture.
3️⃣ If adding optional mix-ins (like chocolate chips or chopped nuts), toss them in a tablespoon of flour before adding them to the batter. This prevents them from sinking to the bottom of the loaf.
📝 Tip: Never add baking soda or salt directly to the wet ingredients without mixing them into the flour first—this can cause uneven distribution, leading to pockets of bitterness or flat banana bread.
3. Gently Folding Dry Ingredients into Wet Ingredients
Once the dry ingredients are properly mixed, it’s time to combine them with the wet mixture. Be careful not to overmix! Overmixing develops too much gluten, resulting in dense or tough banana bread.
✅ Steps to Mix Dry & Wet Ingredients Together
1️⃣ Create a well in the center of the dry ingredient bowl. This makes it easier to incorporate the wet ingredients.
2️⃣ Gradually pour the wet mixture into the dry ingredients.
3️⃣ Use a spatula or wooden spoon to gently fold everything together. Stir just until there are no visible streaks of flour—some small lumps are okay!
4️⃣ If adding mix-ins (like walnuts or chocolate chips), fold them in gently at the very end.
📝 Tip: Stirring too much will overwork the gluten in the flour, making the bread chewy instead of tender. To keep the bread soft and fluffy, mix until just combined.
4. Common Mistakes to Avoid
🔸 Overmixing the batter → Leads to a dense and chewy loaf. Always stir gently and stop once the ingredients are just combined.
🔸 Not sifting or whisking dry ingredients → Can cause uneven distribution of baking soda and salt, leading to inconsistent texture.
🔸 Adding too much flour → Results in dry banana bread. Use the spoon-and-level method for accuracy.
🔸 Pouring wet ingredients too quickly → Can create clumps. Slowly incorporating them helps maintain a smooth batter.
Final Thoughts: Preparing for the Bake
Once the dry and wet ingredients are gently combined, your banana bread batter is ready for the next step: pouring it into the loaf pan and baking! Ensuring the batter is mixed properly at this stage will guarantee a beautifully risen, moist, and tender banana bread.
Now, let’s move on to Step 4: Pour & Bake the Banana Bread to bring everything together! 🍞✨
Step 4: Bake to Perfection & Test for Doneness 🍞🔥
Now that your banana bread batter is fully mixed and poured into the prepared loaf pan, it’s time to bake it to golden perfection! This step is all about achieving the perfect texture—moist on the inside, slightly crisp on the edges, and beautifully golden on top. Proper baking time and doneness testing ensure your banana bread is neither undercooked nor dry.
1. The Ideal Baking Temperature & Time
✅ What Temperature Should You Bake Banana Bread?
- The best temperature for baking banana bread is 350°F (175°C).
- This allows the bread to cook evenly, develop a nice crust, and stay moist inside.
- Baking at a higher temperature can cause the edges to brown too quickly while the inside remains undercooked.
✅ How Long Should You Bake Banana Bread?
- The baking time typically ranges between 50 to 60 minutes.
- The exact time depends on your oven, pan size, and even the moisture level in your bananas.
📝 Tip: If using a dark-colored or glass loaf pan, the bread may bake faster. Check for doneness around the 45-minute mark to prevent overbaking.
2. How to Know When Banana Bread is Fully Baked
Determining the perfect doneness is crucial to getting soft, fluffy banana bread instead of one that is raw in the center or dry. Here are a few methods to check if your loaf is fully baked:
✅ The Toothpick Test
1️⃣ Insert a toothpick, skewer, or thin knife into the center of the bread.
2️⃣ If it comes out clean or with just a few moist crumbs, the banana bread is ready.
3️⃣ If it comes out with wet batter, bake for an additional 5–10 minutes and test again.
✅ The Spring-Back Test
1️⃣ Lightly press the center of the loaf with your finger or spoon.
2️⃣ If it springs back instead of sinking, it’s done!
3️⃣ If an indentation remains, it needs more baking time.
✅ Checking Internal Temperature (Optional, but Precise!)
If you have a food thermometer, check the internal temperature:
- A fully baked banana bread should read 200–205°F (93–96°C) in the center.
📝 Tip: If the top is browning too quickly but the inside is still raw, loosely cover the loaf with aluminum foil and continue baking.
3. Cooling the Banana Bread Properly
Once baked, proper cooling is just as important as baking itself. If you slice it too soon, the bread may crumble or feel undercooked due to trapped steam.
✅ Steps for Cooling Banana Bread
1️⃣ Remove the loaf pan from the oven and let it sit on a wire rack for 10–15 minutes. This helps it firm up slightly before removing it from the pan.
2️⃣ Gently loosen the edges with a butter knife, then carefully lift or invert the bread onto the cooling rack.
3️⃣ Allow the bread to cool completely for at least 30–60 minutes before slicing. This ensures the texture sets properly.
📝 Tip: For extra moist banana bread, wrap the cooled loaf in plastic wrap or aluminum foil and let it rest overnight before slicing. This helps the flavors deepen and the texture become even softer.
4. Common Baking Mistakes & How to Fix Them
🔹 Banana bread is raw or gooey in the center → It likely needs more baking time. Check with the toothpick test and bake for another 5–10 minutes if necessary.
🔹 Loaf sinks in the middle → This happens when the batter is overmixed, too much banana was used, or the bread was underbaked.
🔹 Edges are too dark but inside is raw → The oven may be too hot, or the loaf pan might be too dark. Cover with foil and reduce the temperature slightly.
🔹 Bread is too dry → This can happen if too much flour was added or the bread was overbaked. Always measure ingredients properly and check for doneness early.
Final Thoughts: Ready to Enjoy!
After properly baking and cooling, your perfectly moist and fluffy banana bread is ready to be sliced and enjoyed! Serve it warm with butter, add a drizzle of honey, or enjoy it as-is for a delicious homemade treat.
Now that your loaf is complete, the next step is storing it properly to keep it fresh for days—or even freezing it for later! 🍞✨
Pro Tips for Moist & Fluffy Banana Bread

Don’t Overmix: Avoid Dense Banana Bread 🚫🥄
One of the most common mistakes when making banana bread is overmixing the batter. While it may be tempting to stir until the mixture is completely smooth, doing so can lead to dense, tough, or chewy banana bread instead of the light and fluffy texture you want. Proper mixing ensures the perfect balance of moisture and tenderness while allowing the bread to rise evenly.
1. Why Overmixing Leads to Dense Banana Bread
When combining the wet and dry ingredients, you only need to mix until just combined. Overmixing negatively affects banana bread in several ways:
✅ Develops Too Much Gluten
- Flour contains gluten, a protein that provides structure to baked goods.
- When overmixed, gluten strands strengthen and tighten, making the bread tough and chewy instead of soft and tender.
✅ Reduces Air Pockets Needed for Fluffiness
- Overmixing deflates the small air pockets created by the leavening agents (baking soda), resulting in a heavy, dense loaf.
- Properly mixed batter allows air to remain trapped, helping the bread rise and stay light.
✅ Can Cause Uneven Baking
- A dense batter doesn’t bake as evenly, leading to a soggy or undercooked center while the edges may turn dry.
2. How to Mix Banana Bread Batter Properly
✅ Step-by-Step Mixing Guide
1️⃣ Whisk dry ingredients separately – Always mix the flour, baking soda, salt, and any spices in a separate bowl before adding them to the wet ingredients. This ensures even distribution without the need for excessive mixing later.
2️⃣ Gently fold wet and dry ingredients together – Once the dry ingredients are added to the wet mixture, use a spatula or wooden spoon to gently fold the batter.
3️⃣ Mix until just combined – Stir only until no visible streaks of flour remain. A few small lumps are okay! They will dissolve during baking.
4️⃣ Avoid using a whisk or electric mixer – A hand whisk or mixer can encourage overmixing. Stick to a spatula or wooden spoon for better control.
📝 Tip: If using any mix-ins (chocolate chips, nuts, etc.), fold them in at the very end, right before transferring the batter to the pan.
3. How to Fix Overmixed Batter (If You’ve Already Mixed Too Much!)
If you think you’ve overmixed your batter, there are a few ways to improve the texture:
🔹 Let the batter rest – Allowing it to sit for 5–10 minutes before baking can help the gluten relax slightly.
🔹 Add a splash of milk or mashed banana – If the batter looks thick or sticky, adding a small amount of liquid can loosen it up.
🔹 Bake at a slightly lower temperature – Baking at 325°F (160°C) instead of 350°F (175°C) can slow gluten development and produce a softer texture.
4. Common Mixing Mistakes & How to Avoid Them
❌ Mixing too fast or too long → Use slow, gentle folding motions instead of vigorous stirring.
❌ Using an electric mixer → Always mix by hand to prevent excess gluten formation.
❌ Not whisking dry ingredients first → If the dry ingredients aren’t pre-mixed, you might end up overmixing when trying to incorporate them evenly.
❌ Ignoring lumps → Some lumps are okay! Trying to make the batter completely smooth leads to overmixing.
Final Thoughts: The Key to Light, Fluffy Banana Bread
The secret to perfect banana bread lies in minimal mixing. By gently folding the ingredients together and stopping as soon as the flour is incorporated, you’ll achieve a beautifully moist, tender, and fluffy banana bread every time.
Now that your batter is mixed correctly, you’re ready for the next step: pouring it into the loaf pan and baking it to perfection! 🍞✨
Use Overripe Bananas: Sweeter, Softer, and More Flavorful 🍌✨
One of the key secrets to making delicious, moist, and naturally sweet banana bread is using overripe bananas. The riper the bananas, the better the flavor and texture of your loaf. Bananas that are soft, heavily speckled, or even blackened bring extra sweetness, moisture, and a deeper banana taste to your recipe.
If you’ve ever wondered whether your bananas are ripe enough for banana bread, this section will explain why overripe bananas work best, how to tell when they’re ready, and how to ripen them quickly if needed!
1. Why Overripe Bananas Are Best for Banana Bread
Using firm, barely ripe bananas will not yield the best banana bread. Instead, you want bananas that are extremely ripe, even if they look too mushy for eating fresh. Here’s why:
✅ More Natural Sweetness
- As bananas ripen, their starch converts into sugar, making them significantly sweeter.
- Overripe bananas enhance the natural sweetness of banana bread, reducing the need for extra sugar.
✅ Softer Texture = Easier to Mash
- Overripe bananas become softer and creamier, making them easy to mash into a smooth puree.
- This helps create a moist, tender banana bread instead of a dry or crumbly one.
✅ More Intense Banana Flavor
- The longer bananas ripen, the richer and deeper their flavor becomes.
- Using dark-spotted or black bananas ensures that your bread has a strong banana taste, rather than a bland one.
2. How to Tell When Bananas Are Ripe Enough for Banana Bread
Not sure if your bananas are ripe enough? Here’s a guide to help you determine if they’re ready:
| Banana Ripeness | Appearance | Best For? |
|---|---|---|
| Unripe (Green or Yellow) | Firm, no spots | Eating fresh, smoothies |
| Just Ripe (Yellow, Few Brown Spots) | Soft but still firm, mild sweetness | Eating fresh, cereal toppings |
| Overripe (Dark Brown or Black Skin) | Very soft, mushy, deep aroma | Best for banana bread! 🍞 |
✅ The Perfect Bananas for Baking:
- Mostly brown or blackened skin with very few yellow patches.
- Soft, slightly mushy texture that mashes easily.
- A strong banana scent—the riper they are, the better they’ll taste in bread!
📝 Tip: If your bananas are almost there but not quite soft enough, leave them at room temperature for a couple of days until they reach peak ripeness.
3. How to Ripen Bananas Quickly
Need ripe bananas right away? No worries! Here are a few tricks to speed up the ripening process:
🍌 Method 1: Paper Bag Trick (12–24 Hours)
1️⃣ Place your bananas in a brown paper bag with an apple or a ripe banana.
2️⃣ Close the bag loosely and leave it at room temperature.
3️⃣ The ethylene gas released by the fruit will speed up the ripening process overnight.
🔥 Method 2: Oven Method (15–20 Minutes)
1️⃣ Preheat your oven to 300°F (150°C).
2️⃣ Place unpeeled bananas on a baking sheet lined with parchment paper.
3️⃣ Bake for 15–20 minutes, or until the skins turn completely black and the bananas are soft.
4️⃣ Let them cool before peeling and mashing.
⏱️ Method 3: Microwave Method (30 Seconds – 1 Minute)
1️⃣ Peel the bananas and place them in a microwave-safe bowl.
2️⃣ Microwave in 30-second increments, mashing slightly between each round.
3️⃣ Once soft and mushy, they’re ready to use!
📝 Tip: The microwave method works best for bananas that are already slightly ripe but just need a little extra softness.
4. What If My Bananas Are Too Ripe? Can I Still Use Them?
Yes! Even if your bananas are extremely dark or mushy, they are still perfect for banana bread as long as they don’t have mold or a fermented smell.
However, if the bananas are leaking liquid, moldy, or smell like alcohol, they have gone bad and should be discarded.
📝 Tip: If you have too many overripe bananas but aren’t ready to bake yet, freeze them! See the next section for how to store bananas for future baking.
5. How to Store Overripe Bananas for Later
If you don’t want to bake immediately, you can freeze overripe bananas and use them later. Here’s how:
Freezing Whole Bananas
1️⃣ Peel the bananas.
2️⃣ Place them in an airtight container or zip-top bag.
3️⃣ Freeze for up to 3 months.
Freezing Mashed Bananas
1️⃣ Mash the bananas and place them in a sealed container.
2️⃣ Label with the date and the number of bananas.
3️⃣ Freeze for up to 3 months.
How to Use Frozen Bananas
- Let them thaw at room temperature for about 30 minutes before using.
- For smoothies, you can use frozen bananas directly.
- If using in banana bread, drain off any excess liquid before mixing.
Final Thoughts: The Key to Perfect Banana Bread
Using overripe bananas is the secret to sweet, flavorful, and moist banana bread. Whether you let them ripen naturally or speed up the process with an oven or microwave, make sure your bananas are soft, brown-spotted, and full of natural sweetness before using them in your recipe.
Now that you have the perfect bananas, it’s time to move on to the next step: mashing them and mixing the wet ingredients! 🍌🥄
Room Temperature Ingredients: Helps with Even Mixing and Texture 🥚🧈✨
When baking banana bread (or any baked goods), starting with room temperature ingredients is a simple but important step. Using cold butter, eggs, or milk straight from the fridge can affect the texture, mixing process, and overall consistency of your banana bread.
In this section, we’ll explore why room temperature ingredients are crucial, how they impact the final result, and some easy tricks to quickly bring ingredients to room temperature if you’re short on time.
1. Why Room Temperature Ingredients Matter in Banana Bread
Baking is a science, and the temperature of your ingredients plays a key role in how everything combines. When ingredients are at room temperature, they blend more evenly and smoothly, resulting in a soft, fluffy texture in the final loaf.
Here’s why room temperature ingredients are important:
✅ Ensures Even Mixing
- Cold ingredients don’t mix as easily, leading to a lumpy batter or uneven texture.
- Room temperature butter, eggs, and dairy blend seamlessly, preventing overmixing (which can make banana bread dense).
✅ Creates a Lighter, Fluffier Texture
- Room temperature eggs trap more air when mixed, which helps create a soft, tender crumb.
- Soft butter blends better with sugar, helping to achieve a moist, fluffy loaf.
✅ Prevents Curdling in the Batter
- If you mix cold eggs or milk into warm melted butter, the butter may solidify into clumps, creating a grainy or uneven batter.
- Room temperature ingredients combine smoothly for a consistent texture.
✅ Promotes Even Baking
- Cold ingredients can cause the batter to bake unevenly, leading to undercooked spots or an uneven rise.
- A well-mixed, room-temperature batter ensures the loaf bakes evenly from edge to center.
2. Which Ingredients Should Be at Room Temperature?
🧈 Butter (If Using Instead of Oil)
- Room temperature butter should be soft but not melted—you should be able to press it with your finger and leave an indentation.
- Why? Soft butter blends evenly with sugar, creating air pockets that contribute to a light texture.
🥚 Eggs
- Eggs should be warm to the touch, not cold from the fridge.
- Why? Room temperature eggs mix better with other wet ingredients and help the batter rise properly.
🥛 Milk or Yogurt (If Using in the Recipe)
- Should be slightly cool but not straight from the fridge.
- Why? Cold dairy can cause the batter to separate or curdle when mixed with melted butter.
🍌 Bananas
- While bananas don’t need to be warmed up, they should be fully ripe and soft for easy mashing and even distribution in the batter.
3. How to Quickly Bring Ingredients to Room Temperature
If you forgot to take your ingredients out of the fridge ahead of time, don’t worry! Here are some quick fixes:
🧈 How to Soften Butter Quickly (Without Melting It)
1️⃣ Cut butter into small cubes and let it sit for 15–20 minutes.
2️⃣ Place the butter in a microwave-safe bowl and heat it at 50% power in 5-second intervals (don’t overheat!).
3️⃣ Use a rolling pin to flatten the butter between two pieces of parchment paper—it softens faster this way!
🥚 How to Warm Up Eggs Quickly
1️⃣ Place cold eggs in a bowl of warm water (not hot!) for 5–10 minutes.
2️⃣ Crack the eggs into a small bowl and let them sit for 5 minutes before adding to the batter.
🥛 How to Warm Up Milk or Yogurt Quickly
1️⃣ Microwave for 10–15 seconds, then stir to distribute the heat evenly.
2️⃣ Let it sit at room temperature for 10–15 minutes before using.
4. What Happens If You Use Cold Ingredients?
If you skip this step and use cold ingredients straight from the fridge, your banana bread might:
❌ Have an uneven texture – Cold ingredients don’t mix well, leading to dense, lumpy, or unevenly baked bread.
❌ Not rise properly – Cold eggs and butter can prevent proper aeration, making the loaf flat instead of fluffy.
❌ Cause curdling – Cold milk mixed with melted butter can make the batter separate, leading to an undesirable texture.
Final Thoughts: A Simple Trick for Better Banana Bread
Using room temperature ingredients is a small but game-changing step for making banana bread with a light, fluffy, and moist texture. Taking a few minutes to warm up your butter, eggs, and dairy will improve mixing, prevent curdling, and ensure even baking.
Now that your ingredients are at the perfect temperature, you’re ready to start making your smooth, well-mixed banana bread batter! 🍌🍞
Storing & Freezing Banana Bread
Short-Term Storage: Keep Fresh for Up to 4 Days 🍞✨
Banana bread is best enjoyed fresh, but if you’ve baked a loaf and want to keep it moist and delicious for a few days, proper storage is key. Storing it incorrectly can lead to dry, stale, or soggy bread—which nobody wants!
In this section, we’ll cover the best ways to store banana bread for short-term freshness, the ideal conditions for keeping it moist, and a few mistakes to avoid.
1. How Long Does Banana Bread Stay Fresh?
When stored correctly at room temperature or in the fridge, banana bread stays soft, flavorful, and fresh for up to 4 days. Here’s what to expect based on different storage methods:
| Storage Method | Shelf Life | Best For |
|---|---|---|
| Room Temperature (Airtight container) | Up to 4 days | Best for soft, moist bread |
| Refrigerated (Wrapped tightly) | Up to 7 days | Extends freshness but may dry out |
| Frozen (Well-wrapped & sealed) | Up to 3 months | Long-term storage |
If you plan to eat the bread within a few days, keeping it at room temperature in an airtight container is the best method for maintaining moisture and texture.
2. How to Store Banana Bread at Room Temperature
✅ Step 1: Let It Cool Completely
Before storing, ensure your banana bread has completely cooled to room temperature. Storing warm bread can:
- Trap steam inside the container, making the bread soggy.
- Cause condensation, which can lead to mold growth.
✅ Step 2: Wrap It Properly
To keep banana bread moist and soft, wrap it in one of the following:
- Plastic wrap – Creates a tight seal to lock in moisture.
- Aluminum foil – Protects the bread from drying out.
- Beeswax wrap – A reusable, eco-friendly option.
✅ Step 3: Store in an Airtight Container
After wrapping, place the bread in an airtight container or a resealable plastic bag. This prevents air from drying out the loaf while maintaining freshness.
📝 Pro Tip: If you like a slightly crisp crust, leave a small gap in the wrapping to allow minimal airflow.
✅ Step 4: Keep It in a Cool, Dry Place
Store the container in a cool, dry spot away from direct sunlight—such as a pantry or kitchen counter. Avoid keeping it near the stove or oven, where heat can affect its texture.
3. Can You Store Banana Bread in the Fridge?
Yes, you can refrigerate banana bread, but it’s not the best option for short-term storage. Refrigeration can dry out the bread faster, especially if it’s not wrapped well.
✅ How to Refrigerate Banana Bread Without Drying It Out
1️⃣ Wrap the bread tightly in plastic wrap or foil to prevent moisture loss.
2️⃣ Place it in an airtight container for extra protection.
3️⃣ Store in the fridge for up to 7 days.
To serve:
- Let the bread come to room temperature for 10–15 minutes before eating to restore its softness.
- For extra freshness, microwave a slice for 10–15 seconds or toast it lightly.
📝 Pro Tip: If you refrigerate banana bread, consider spreading a bit of butter or honey on a slice before eating to add back some moisture!
4. How to Tell If Banana Bread Has Gone Bad
Even with proper storage, banana bread won’t last forever. Here are signs that it’s time to toss your loaf:
❌ Mold Growth – If you see white, green, or black spots, discard it immediately.
❌ Dry & Hard Texture – If it feels rock-hard, it has dried out completely.
❌ Sour Smell – A musty or sour odor indicates spoilage.
❌ Excess Moisture – If the bread feels sticky or excessively damp, mold is likely developing.
📝 Pro Tip: If you won’t finish your banana bread within 4 days, consider freezing it instead of letting it go stale!
Final Thoughts: Enjoy Fresh Banana Bread for Days!
For short-term storage, keeping banana bread wrapped and in an airtight container at room temperature is the best way to maintain its moisture and flavor. If you need a few extra days, refrigeration is an option—but be sure to wrap it well to prevent drying out.
By following these tips, your homemade banana bread will stay soft, fresh, and delicious for days—ready to enjoy as a breakfast treat, snack, or dessert! 🍌🍞✨
Freezing Instructions: How to Freeze Banana Bread Properly ❄️🍞
If you’ve made a delicious loaf of banana bread but can’t finish it within a few days, freezing is the best way to keep it fresh for up to 3 months. Proper freezing preserves the moisture, texture, and flavor, so when you’re ready to enjoy it, your banana bread will taste just as good as the day it was baked!
In this section, we’ll go over the best methods for freezing banana bread, including how to wrap it properly, thaw it correctly, and avoid common freezing mistakes.
1. Should You Freeze Banana Bread?
Yes! Banana bread freezes exceptionally well. Whether you freeze a whole loaf, slices, or muffins, the key is to protect it from freezer burn and moisture loss.
Here’s why freezing banana bread is a great idea:
✅ Saves time – Bake in bulk and freeze for later.
✅ Reduces waste – No more tossing stale banana bread!
✅ Perfect for meal prep – Always have a slice ready for breakfast or snacks.
✅ Preserves flavor & texture – When stored correctly, your banana bread stays moist and delicious.
2. How to Freeze Banana Bread (Whole Loaf vs. Slices)
Option 1: Freezing a Whole Loaf (Best for long-term storage)
Freezing the entire loaf keeps it moist and prevents slices from drying out.
How to Freeze a Whole Loaf:
1️⃣ Cool completely – Let the banana bread cool at room temperature for at least 2 hours before freezing. Freezing warm bread causes ice crystals to form, leading to sogginess.
2️⃣ Wrap it tightly – Use plastic wrap to wrap the entire loaf twice, ensuring no air gets in.
3️⃣ Add a second layer – Wrap the plastic-covered loaf in aluminum foil or place it in a large freezer bag for extra protection against freezer burn.
4️⃣ Label & store – Write the date on the package and place it in the freezer. Banana bread stays fresh for up to 3 months when properly stored.
📝 Pro Tip: If you know you’ll only eat a few slices at a time, consider slicing the loaf first before freezing. This way, you can thaw only what you need!
Option 2: Freezing Individual Slices (Best for quick snacks)
Freezing banana bread in slices makes it easy to grab one at a time without defrosting the whole loaf.
How to Freeze Slices:
1️⃣ Cool completely – Let the bread cool to room temperature before slicing.
2️⃣ Slice evenly – Cut the loaf into even slices, about ¾ to 1 inch thick.
3️⃣ Wrap each slice – Wrap each slice individually in plastic wrap to prevent freezer burn.
4️⃣ Use a freezer bag – Place the wrapped slices in a ziplock bag or airtight container.
5️⃣ Label & freeze – Write the date on the bag and store in the freezer for up to 3 months.
📝 Pro Tip: Place a piece of parchment paper between slices before freezing. This prevents them from sticking together, making it easy to grab a single slice when needed!
Option 3: Freezing Banana Muffins (Great for portion control)
If you made banana bread muffins, the freezing method is slightly different but just as easy.
How to Freeze Muffins:
1️⃣ Cool completely – Let the muffins cool fully before freezing.
2️⃣ Pre-freeze (optional) – Arrange the muffins on a baking sheet and freeze for 1–2 hours until solid. This prevents them from sticking together.
3️⃣ Wrap & store – Transfer the muffins to a ziplock freezer bag or airtight container. Remove as much air as possible before sealing.
4️⃣ Label & freeze – Store in the freezer for up to 3 months.
📝 Pro Tip: Pre-wrapping is not necessary for muffins if you pre-freeze them first. However, if you want extra freshness, wrap each muffin in plastic wrap before placing them in the freezer bag.
3. How to Thaw Frozen Banana Bread
When you’re ready to enjoy your frozen banana bread, proper thawing ensures it stays moist and flavorful.
How to Thaw a Whole Loaf
1️⃣ Remove the loaf from the freezer and unwrap it (this prevents condensation from making it soggy).
2️⃣ Place it on a wire rack or plate and let it thaw at room temperature for 2–4 hours.
3️⃣ To serve warm, heat the loaf in a 300°F (150°C) oven for 10–15 minutes.
How to Thaw Individual Slices
1️⃣ Take out a frozen slice and unwrap it.
2️⃣ Let it sit at room temperature for 30–60 minutes.
3️⃣ For a quick thaw, microwave a slice on low power (50%) for 20–30 seconds.
How to Thaw Banana Muffins
1️⃣ Let muffins sit at room temperature for 1 hour.
2️⃣ Warm them in a toaster oven at 300°F (150°C) for 5–10 minutes.
3️⃣ Microwave for 15–20 seconds if you’re in a hurry.
📝 Pro Tip: If your banana bread seems slightly dry after thawing, spread a little butter or honey on top before serving to restore moisture!
4. Avoid These Common Freezing Mistakes 🚫
❌ Freezing warm banana bread – Always let it cool first to prevent ice crystals and sogginess.
❌ Not wrapping it properly – Double-wrap with plastic wrap and foil to avoid freezer burn.
❌ Skipping the label – Always write the date so you don’t forget how long it’s been in the freezer.
❌ Thawing in the microwave on high – This can make the bread rubbery. Use low power or let it thaw naturally.
Final Thoughts: Enjoy Banana Bread Anytime! 🍌❄️
Freezing banana bread is an easy and effective way to preserve its soft, moist texture for months. Whether you store a whole loaf, slices, or muffins, proper wrapping and thawing techniques ensure it tastes just as fresh as the day it was baked.
Now, whenever you’re craving homemade banana bread, you’ll always have some ready to enjoy—no baking required! 🍞✨
Reheating Tips: Best Ways to Warm Up Leftover Banana Bread 🔥🍞
Banana bread is best enjoyed warm, with its soft, moist texture and rich banana flavor shining through. If you have leftover banana bread, you might wonder how to reheat it properly without making it dry, rubbery, or too soggy.
Luckily, there are several effective ways to bring your banana bread back to life while keeping it moist and delicious. In this section, we’ll explore the best reheating methods, along with pro tips to enhance its flavor and texture.
1. Best Methods to Reheat Banana Bread
The ideal reheating method depends on how much banana bread you’re warming up and how much time you have. Here are the top reheating options:
Option 1: Oven (Best for Whole Loaves & Slices)
The oven is the best way to reheat banana bread evenly while preserving its original soft texture. It also prevents the bread from drying out compared to other methods.
How to Reheat in the Oven:
1️⃣ Preheat your oven to 300°F (150°C).
2️⃣ Wrap the banana bread loosely in aluminum foil to lock in moisture while allowing even heating.
3️⃣ Place the wrapped banana bread on a baking sheet.
4️⃣ Baking times:
- Whole loaf: 10–15 minutes
- Slices: 5–7 minutes
5️⃣ Remove from the oven and let it sit for 1–2 minutes before serving.
📝 Pro Tip: If your banana bread seems a little dry, lightly brush the top with melted butter or honey before wrapping it in foil. This will help restore moisture and enhance flavor.
Option 2: Microwave (Fast & Easy for Slices)
If you’re in a hurry, the microwave is the quickest way to reheat banana bread. However, it can make the bread rubbery or dry if overheated.
How to Reheat in the Microwave:
1️⃣ Place a slice of banana bread on a microwave-safe plate.
2️⃣ Cover it loosely with a damp paper towel to retain moisture.
3️⃣ Microwave on medium power (50%) for 15–20 seconds.
4️⃣ Check the warmth, and if needed, microwave for another 5–10 seconds.
5️⃣ Let it rest for a few seconds before serving.
📝 Pro Tip: If you want to enhance the flavor, spread a little butter, peanut butter, Nutella, or honey on top before microwaving.
Option 3: Toaster or Toaster Oven (Crispy Edges, Soft Inside)
For a toasty, slightly crispy banana bread texture, a toaster or toaster oven works best. This method gives your bread a warm center with a delicious golden-brown crust.
How to Reheat in a Toaster or Toaster Oven:
1️⃣ Set your toaster oven or toaster to a low-to-medium heat setting.
2️⃣ Place a slice of banana bread directly on the rack or a baking tray.
3️⃣ Toast for 1–2 minutes, checking frequently to prevent burning.
4️⃣ Serve immediately with butter or a drizzle of honey.
📝 Pro Tip: This method is not recommended for very soft, moist banana bread as it may fall apart in a regular toaster. If your bread is extra moist, use the oven or microwave instead.
Option 4: Stovetop (For a Buttery, Slightly Crispy Finish)
If you love warm, slightly crispy banana bread with a rich, buttery flavor, try reheating it on the stovetop.
How to Reheat on the Stovetop:
1️⃣ Heat a non-stick skillet over low to medium heat.
2️⃣ Melt a small amount of butter or coconut oil in the pan.
3️⃣ Place the banana bread slice in the pan and cover with a lid.
4️⃣ Heat for 1–2 minutes per side, flipping halfway through.
5️⃣ Remove from the pan and serve warm.
📝 Pro Tip: This method gives the bread a slightly caramelized, buttery crust—perfect with a drizzle of maple syrup!
2. How to Keep Reheated Banana Bread Moist & Delicious
To preserve moisture and enhance flavor, try these simple tricks:
✔️ Wrap before reheating – Using foil (for oven) or a damp paper towel (for microwave) prevents drying.
✔️ Add butter or honey – Spread a light layer of butter, honey, or syrup before reheating to keep it moist.
✔️ Use lower temperatures – Slow, gentle heating ensures the bread stays soft and doesn’t overcook.
✔️ Avoid overheating – Shorter reheating times work best to prevent drying out.
3. Common Mistakes to Avoid 🚫
❌ Overheating in the microwave – Can make banana bread rubbery or dry. Always use low or medium power and short intervals.
❌ Skipping the wrap – If you don’t cover it with foil (oven) or a damp paper towel (microwave), the bread can dry out.
❌ Toasting very soft banana bread – If your banana bread is extra moist, using a toaster may cause it to fall apart or burn.
❌ Using high temperatures – Heat gently at low to medium heat for the best texture.
4. Serving Ideas: Make Your Reheated Banana Bread Even Better!
Want to make your banana bread even more delicious? Try these tasty serving ideas after reheating:
✔️ Butter & honey – A classic combo that adds moisture and richness.
✔️ Peanut butter or almond butter – A protein-packed topping with a creamy texture.
✔️ Nutella or chocolate drizzle – Perfect for a dessert-like treat.
✔️ Fresh fruits – Serve with sliced bananas, strawberries, or blueberries.
✔️ Whipped cream or yogurt – Adds a creamy, tangy contrast.
✔️ Cinnamon sugar sprinkle – Enhances the warmth and sweetness.
Final Thoughts: Warm & Delicious Banana Bread Anytime! 🍌🔥
Reheating banana bread properly can restore its soft, moist texture and bring back the rich, sweet flavor. Whether you prefer the oven, microwave, toaster, or stovetop, each method has its advantages.
Now, you never have to eat cold banana bread again—just warm it up and enjoy! 🍞✨
Conclusion: Enjoy the Perfect Banana Bread Anytime! 🍌🍞
Banana bread is a timeless classic, loved for its soft, moist texture and naturally sweet flavor. Whether you enjoy it fresh out of the oven, as a quick breakfast, a midday snack, or a delicious dessert, knowing how to store, freeze, and reheat it properly ensures you can savor every bite—even days later!
By using ripe bananas, simple ingredients, and the right baking techniques, you can achieve the perfect banana bread every time. And with the right storage and reheating methods, you can bring back that fresh-from-the-oven taste whenever you want!
Now that you have all the tips and tricks, it’s time to bake, enjoy, and share your delicious banana bread. Whether you like it plain, loaded with walnuts, or with a touch of chocolate chips, this recipe is versatile, comforting, and always a crowd-pleaser!
💛 Happy baking, and enjoy your banana bread! 💛
1 thought on “How to Make the Perfect Banana Bread (Step-by-Step Guide)”